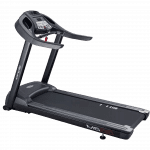

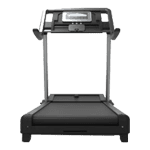


In the realm of gym equipment maintenance, treadmill running belt replacement stands out as a crucial task that ensures the longevity and optimal performance of the machine. Over time, the running belt can wear out due to regular usage, leading to issues such as slippage, uneven motion, and increased strain on the motor. These problems not only affect the user experience but can also result in costly repairs if not addressed promptly.
Understanding the importance of timely replacement is essential for gyms, health clubs, condominiums, and other facilities that rely heavily on treadmills for their fitness programs. A well-maintained treadmill not only provides a safe and effective workout for users but also reflects the facility’s commitment to quality and user satisfaction. Whether you’re a property manager, a gym owner, or part of a homeowner association, staying informed about the basics of treadmill maintenance can save you significant time and resources.
At MaxPowerRepairs.com, we specialize in providing top-notch maintenance and repair services for commercial and professional gym equipment. Our expertise ensures that your treadmills remain in peak condition, offering reliable performance for your clients or residents. If you need assistance with treadmill running belt replacement or any other gym equipment services, contact us at: info@MaxPowerRepairs.com.
Signs Your Treadmill Belt Needs Replacement
Recognizing the signs that your treadmill running belt needs replacement is essential to maintaining a safe and efficient workout environment. Here are some key indicators that it’s time to consider a new belt:
- Visible Wear and Tear: Over time, the treadmill belt may develop cracks, frays, or an uneven surface. These visible signs of deterioration suggest that the belt is no longer providing the smooth, consistent motion required for safe exercise.
- Slipping or Skipping: If you notice that the belt slips or skips during use, it could indicate that the belt has stretched or the grip has worn down. This can compromise the safety of the treadmill, making it harder for users to maintain balance.
- Unusual Noises: Squeaking, grinding, or other unusual noises can be a sign that the belt is misaligned or excessively worn. These sounds often signify increased friction, which can put additional strain on the treadmill’s motor.
- Burning Smell: A burning smell emanating from the treadmill is a critical warning sign. It may indicate that the belt is overheating due to friction, which can lead to motor damage if not addressed promptly.
- Inconsistent Speed: An old or damaged belt can cause the treadmill to operate at inconsistent speeds, making it difficult for users to maintain their desired pace. This not only affects workout quality but can also pose a safety risk.
By keeping an eye out for these signs, property managers, gym owners, and other facility operators can ensure their treadmills remain in top condition, providing a reliable and safe exercise option for all users.
Tools and Materials Needed for Replacement
Before diving into the process of treadmill running belt replacement, it’s crucial to gather all the necessary tools and materials. Having everything ready will make the task more efficient and less stressful. Here’s a comprehensive list of what you’ll need:
- Screwdrivers: Both Phillips and flathead screwdrivers are essential for removing the screws that hold the treadmill cover and deck in place.
- Allen Wrenches: Most treadmills require Allen wrenches for adjusting the belt tension and removing certain bolts. Check your treadmill’s manual for the specific sizes needed.
- Wrench Set: A variety of wrenches may be necessary to loosen and tighten bolts on the treadmill frame and motor mount.
- Replacement Belt: Ensure you have the correct replacement belt for your treadmill model. Double-check the specifications in your treadmill’s manual or consult the manufacturer.
- Lubricant: Treadmill belt lubricant is essential for reducing friction between the belt and deck, helping to extend the life of both components. Be sure to use a lubricant recommended by the treadmill manufacturer.
- Cleaning Supplies: Before installing the new belt, clean the treadmill deck thoroughly to remove any debris or dust. A soft cloth and mild cleaner are typically sufficient.
- Measuring Tape: Use a measuring tape to ensure the belt is centered and properly aligned during installation.
- Safety Gear: Protective gloves and safety glasses are recommended to protect your hands and eyes during the replacement process.
Having these tools and materials on hand will streamline the replacement process, ensuring your treadmill is back in working order quickly and safely. Proper preparation sets the stage for a successful belt replacement, minimizing downtime and enhancing the longevity of your equipment.
Step-by-Step Treadmill Belt Replacement Guide
Replacing a treadmill running belt may seem daunting, but with a systematic approach, it can be a manageable task. Follow these step-by-step instructions to ensure a smooth replacement process:
- Unplug the Treadmill: Safety first! Make sure the treadmill is unplugged from the power source to avoid any electrical hazards.
- Remove the Motor Hood: Use a Phillips or flathead screwdriver to remove the screws securing the motor hood. Carefully lift off the hood to expose the motor and belt area.
- Loosen the Belt Tension: Locate the adjustment bolts at the back of the treadmill. Use an Allen wrench to turn the bolts counterclockwise, loosening the belt tension.
- Remove the Old Belt: Carefully slide the old belt off the treadmill deck. Take note of how the belt is positioned and aligned for reference during the installation of the new belt.
- Clean the Deck: Before installing the new belt, thoroughly clean the treadmill deck with a soft cloth and mild cleaner to remove any dust or debris. This ensures a smooth surface for the new belt.
- Install the New Belt: Position the new running belt on the deck, ensuring it is properly aligned. Slide the belt onto the front roller first, then work it onto the rear roller. Make sure the belt is centered.
- Tighten the Belt Tension: Use the Allen wrench to turn the adjustment bolts clockwise, gradually tightening the belt. Ensure it is tight enough to avoid slipping but not overly tight to cause excessive wear.
- Align the Belt: Turn the treadmill on at a low speed and observe the belt’s alignment. Use the adjustment bolts to tweak the alignment, ensuring the belt runs straight and centered.
- Test the Treadmill: Gradually increase the treadmill speed and walk on the belt to ensure it operates smoothly. Make any final adjustments as needed.
- Replace the Motor Hood: Once satisfied with the belt’s performance, reattach the motor hood securely with the screws.
By following these steps, you can confidently replace your treadmill running belt, ensuring your equipment remains in top condition for optimal performance.
Tips for Maintaining Your New Treadmill Belt
After successfully replacing your treadmill running belt, it is crucial to maintain it properly to extend its lifespan and ensure your treadmill operates efficiently. Here are some essential tips for maintaining your new treadmill belt:
- Regular Cleaning: Keep the treadmill belt free of dust and debris by wiping it down with a damp cloth after each use. This helps prevent dirt from accumulating and causing wear.
- Lubrication: Periodically lubricate the treadmill belt according to the manufacturer’s recommendations. Proper lubrication reduces friction between the belt and the deck, preventing excessive wear and tear.
- Check Belt Alignment: Regularly inspect the belt alignment to ensure it is centered and running smoothly. Misalignment can lead to uneven wear and potential damage to the belt and rollers.
- Monitor Tension: Keep an eye on the belt tension. It should be tight enough to prevent slipping but not so tight that it causes strain on the motor or the belt itself. Adjust the tension as needed.
- Inspect for Wear: Frequently check the belt for signs of wear, such as fraying edges or a smooth, shiny surface. Replace the belt if you notice any significant wear to avoid further damage to the treadmill.
- Use a Treadmill Mat: Place a treadmill mat underneath the machine to protect both the floor and the treadmill. The mat can also reduce vibrations and noise, providing a more stable workout environment.
- Adhere to Weight Limits: Make sure the treadmill is used within the specified weight limits. Exceeding these limits can put undue stress on the belt and other components, leading to premature wear.
- Schedule Professional Maintenance: Even with regular personal maintenance, it is beneficial to have a professional technician inspect and service your treadmill periodically. They can identify and address any potential issues before they become major problems.
By following these maintenance tips, you can ensure that your new treadmill belt remains in excellent condition, providing a smooth and reliable workout experience for years to come.
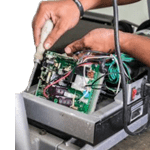
When to Call Professional Treadmill Repair Services
While regular maintenance can significantly extend the life of your treadmill, there are instances when professional repair services are necessary. Recognizing the signs that indicate it’s time to call in the experts can save you from costly repairs and ensure your equipment remains safe and functional.
- Unusual Noises: If you hear grinding, squeaking, or knocking sounds coming from your treadmill, it may indicate a mechanical issue that needs professional attention. These noises can be signs of worn-out parts or components that are out of alignment.
- Erratic Speed: A treadmill that speeds up, slows down, or stops unexpectedly can be dangerous. This erratic behavior is often caused by problems with the motor, belt, or electronic components and requires a professional diagnosis and repair.
- Burning Smell: Any burning smell coming from your treadmill is a serious concern. It could indicate an overheating motor, electrical issues, or friction between components. Immediately stop using the treadmill and contact a professional repair service.
- Belt Slippage: If the running belt slips or shifts while you are using the treadmill, it can cause accidents and injuries. Belt slippage can result from improper tension, worn-out belts, or issues with the deck, all of which need professional adjustment or replacement.
- Display Malfunctions: A malfunctioning display that shows incorrect data, flickers, or fails to turn on could be due to electrical problems or faulty wiring. Professional technicians can accurately diagnose and fix these issues.
- Frequent Circuit Breaker Trips: If your treadmill frequently trips the circuit breaker, it may be drawing too much power, indicating a problem with the motor or electrical components that require professional intervention.
- General Wear and Tear: Over time, regular use can lead to general wear and tear on your treadmill’s components. A professional maintenance check can identify parts that are close to failure and replace them before they cause more significant problems.
Don’t wait until minor issues become major problems. If you notice any of these signs, it’s time to call in professional treadmill repair services. For expert assistance and to ensure your treadmill remains in top condition, contact us at info@MaxPowerRepairs.com. Our team of skilled technicians is ready to help keep your equipment running smoothly.